

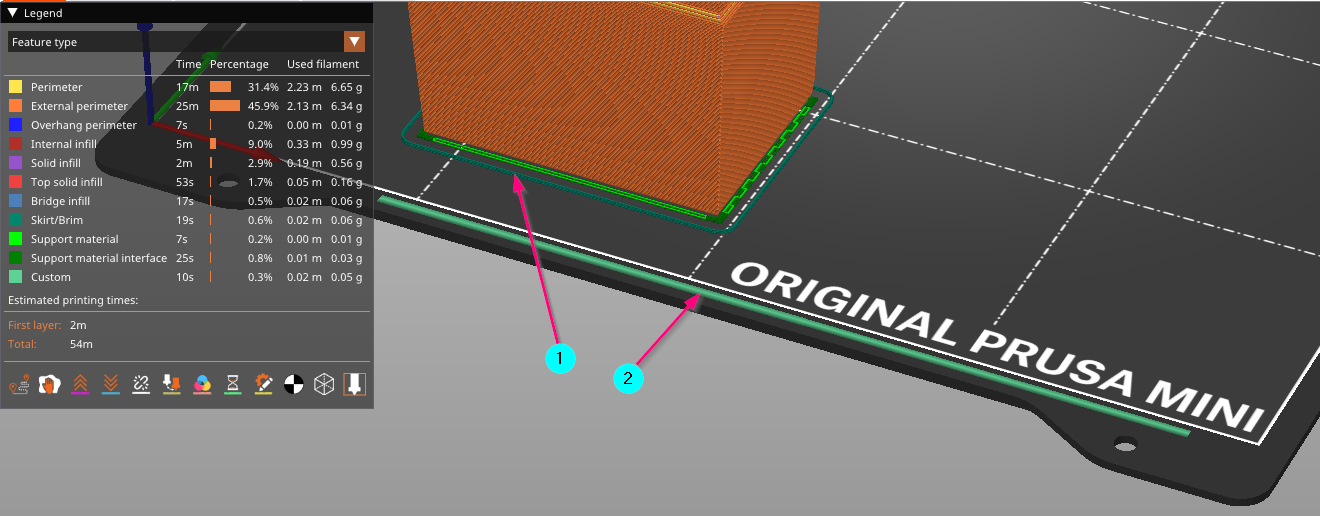
My printer (well, PrusaSlicer) always starts with a line around the object I am printing. See (1) in the image. –Why? What does that do?
There is also this line (2) at the front of the bed. –Why? What does that do?
The line around the object I believe is meant to purge and fill the nozzle. Without it, there’s a chance you start printing and a big chunk of your first layer doesn’t have any filament.
The second part is a nozzle cleaning. It wipes the nozzle on a part of the bed that won’t be used for printing to get debris off of it before printing. Cura does the same thing on my tevo tornado and actually sends a message saying what it’s doing so when I’m logged into reprapfirmware it says “cleaning nozzle”
The 2 is a purge line, meant to clear any pressure in the nozzle and wipe it off before a print. It can be edited in your Start G-code on the printer settings tab > custom g-code on prusaslicer.
The 1 is a skirt, meant to get rid of any last few hanging bits of filament and start a clean print (sometimes the purge line doesn’t get everything off the nozzle). It can also be used to gauge any last minute adjustments to your z offset. If the nozzle is too close or too far, you’ll know before the print actually starts. I find that the skirt can be disabled if you’re using a brim, since it’s redundant at that point. Some who have fine tuned printers may opt not to use one at all without much issue. It isn’t meant as any kind of draft shield as another person said - that’s a separate setting. It’s just a failsafe for the cleanest prints possible, avoiding hanging bits of filament, blobs from built up pressure, and incorrect z height. The first layer is the most important so everything that helps the first layer helps the rest.
In addition to what is mentioned by others, it starts the flow going to get a smooth pressure in the nozzle. While heating up the bed/nozzle, there can be an inconsistent melt in the nozzle. Sometimes a bit will ooze out and leave the nozzle empty. The purge will even all that stuff out and get fresh filament in there before it starts actually printing
The skirt wipes and me the nozzle and also purges a fairly large amount of filament. Together that ensures when the print starts, it starts “clean”.
In addition to what others have said, it also gives you an indication of how well leveled your bed is in the immediate area of the print.
It also helps reduce draughts directly on the first layer even minimal can help adhesion.
Further to what others have said, if you turn on advanced settings you can control the hight of the skirt (the bit around it) so it’s the full height of the model for example.
This is useful for more difficult materials that shrink a lot etc as it effectively builds an enclosure for the print as it goes along.
